
mxcad-app Integration Guide
Preface
We have created an online CAD project based on mxcad, which includes various CAD-related functions such as drawing preview, editing, and operating the drawing database. Users can integrate this project into their own systems to quickly upgrade their systems to include professional CAD capabilities. After integration, personalized secondary development can also be performed according to the specific needs of their own system. In the existing project, we provide two integration methods: one is integrating the mxcad project via iframe, and the other is directly integrating the mxcad-app plugin into the project. The following article will detail the second method, the mxcad-app integration. Compared to iframe embedding, this method is more convenient and fast, and subsequent maintenance only requires maintaining the current single system project. For future MxCAD project integrations, we also highly recommend using the new mxcad-app method.
View the MxCAD project online at: https://www.webcadsdk.com/mxcad/
The MxCAD project initialization interface is as follows:
Basic Integration Steps
Integrating mxcad-app based on Vite
Step 1: Import the style files required by the mxcad project in main.js and create the initial MxCAD project.
// Import mxcad-app styles
import "mxcad-app/style";
// Import MxCADView
import { MxCADView } from "mxcad-app";

// Create default mxcad project
new MxCADView().create();
Step 2: Add MxCAD project-related resource configurations in vite.config.js.
import { defineConfig } from "vite";
import { mxcadAssetsPlugin } from "mxcad-app/vite";

export default defineConfig({
  plugins: [
      ...
      mxcadAssetsPlugin(),
      ...
  ],
});
Integrating mxcad-app based on Webpack
Step 1: Import the style files required by the mxcad project in main.js and create the initial MxCAD project.
// Import mxcad-app styles
import "mxcad-app/style";
// Import MxCADView
import { MxCADView } from "mxcad-app";

// Create default mxcad project
new MxCADView().create();
Step 2: Add MxCAD project-related resource configurations in webpack.config.js.
First, install dependencies:
npm install style-loader css-loaderThen configure webpack.config.js:
const { MxCadAssetsWebpackPlugin } = require("mxcad-app/webpack");
const webpack = require("webpack");
const path = require("path");

module.exports = {
  // ...
  mode: "development",
  module: {
    rules: [
      {
        test: /\.css$/, // Match all .css files
        use: [
           "style-loader", // Step 2: Inject CSS code into DOM <style> tags
           "css-loader", // Step 1: Parse CSS files, handle @import and url()
        ],
        include: [path.resolve(__dirname, "src"), path.resolve(__dirname, "node_modules/mxcad-app")], // Optional: Only process css under src
      },
    ],
  },
  plugins: [
    new webpack.ContextReplacementPlugin(
      /mxcad-app/, // Match module paths containing mxcad-app
      path.resolve(__dirname, "src") // Limit context search scope
    ),
    new MxCadAssetsWebpackPlugin(),
  ],
  // ...
  devServer: {
    static: "./dist",
    port: 3000,
  },
};
Advanced Usage
Custom Interface Container
If mxcad-app does not specify a page container element, it will default to creating a container with width 100vw and height 100vh directly in the project interface, displaying the mxcad project in full screen. In certain scenarios, we need to dynamically control the visibility or display range of the mxcad project. Therefore, we set the following configurations to specify a specific interface container for mxcad-app.
<div id="myMxCAD" style="width: 50vw; height: 50vh"></div>// Custom container
import { MxCADView, mxcadApp } from "mxcad-app";
/**
* openFile: Path of the file to open
* rootContainer: Name of the mxcad project container
* map: Whether to display map mode
*/
new MxCADView({
// mxcadApp.getStaticAssetPath()).toString() gets the static asset path of mxcad-app, defaulting to node_modules/mxcad-app/dist/mxcadAppAssets
openFile: new URL("test.mxweb", mxcadApp.getStaticAssetPath()).toString(),
rootContainer: "#myMxCAD",
}).create();If you need to modify the internal static resource path of the MxCAD project, you can call the setStaticAssetPath() method.
import { mxcadApp } from "mxcad-app";
mxcadApp.setStaticAssetPath("https://unpkg.com/mxcad-app/dist/mxcadAppAssets");
Build Configuration Settings
The mxcad-app plugin provides the mxcadAssetsPlugin method to configure the MxCAD project's WASM loading method, third-party dependencies, subdirectory name for resource storage, interface UI, shortcut commands, server configuration, theme styles, etc. Users can modify the internal configuration of the MxCAD project according to their needs in different scenarios.
Configuration based on Vite:
import { mxcadAssetsPlugin } from "mxcad-app/vite";
// vite.config.js
export default {
  plugins: [
    mxcadAssetsPlugin({
      isWasmSt: true,
      libraryNames: ["vue"],
      outputDir: 'testName',
      // Modify UI configuration
      transformMxUiConfig: (config) => {
        config.title = "My CAD"; // Modify title
        return config;
      },
      // Modify server configuration
      transformMxServerConfig: (config) => {
        config.serverUrl = "/api/cad"; // Modify API address
        return config;
      },
      // Modify shortcut commands (command aliases)
      // transformMxQuickCommand: (config) => config

      // Modify Sketches and Notes UI mode configuration
      // transformMxSketchesAndNotesUiConfig: (config) => config

      // Modify Vuetify theme configuration
      // transformVuetifyThemeConfig: (config) => config
    }),
  ],
};
Configuration based on Webpack:
import { MxCadAssetsWebpackPlugin } from "mxcad-app/webpack";

module.exports = {
  plugins: [
    new MxCadAssetsWebpackPlugin({
      isWasmSt: true,
      libraryNames: ["vue"],
      outputDir: 'testName',
      transformMxServerConfig: (config) => {
        if (process.env.NODE_ENV === 'production') {
          config.serverUrl = 'https://api.prod.com/cad';
        }
        return config;
      }
        ...
    })
 ]
};
Setting WASM Loading Method
The MxCAD project internally uses multi-threading to load WASM resources by default. If you need to set single-threaded loading, you can set the isWasmSt property in the mxcadAssetsPlugin method.
/** Whether to load wasm in single-threaded mode (default is multi-threaded loading) */
isWasmSt: true
Third-Party Dependencies
Users can directly import and use the mxcad and mxdraw modules used internally by mxcad-app. If users need to use other dependencies within mxcad-app, they can add these external npm libraries to the libraryNames property in the mxcadAssetsPlugin method and then use them directly.
Currently supported dependency mapping libraries include vue, axios, vuetify, vuetify/components, mapboxgl, pinia. You can also access window.MXCADAPP_EXTERNALLIBRARIES to get all provided dependency libraries, thus not relying on build tools.
libraryNames: ["vue", "axios", ...]
// After adding to the configuration file, you can normally use the vue module in mxcad-app (the internal vue module packaged by mxcad-app)
import { ref } from "vue";
const n = ref(1);
Subdirectory Name for Static Resources After Build
After installing mxcad-app in your project and importing the MxCAD project, a folder named mxcadAppAssets will be created by default during the build process to store all MxCAD-related static resources. If users need to modify the folder name for placing static resources, they can directly call the outputDir property value in the mxcadAssetsPlugin method.
outputDir: 'testName'Modifying Interface UI, CAD Shortcut Commands, Server Configuration, Theme Styles, etc.
Call the transform methods provided in the mxcadAssetsPlugin method to deeply configure the MxCAD project.
// Modify UI configuration
/** Click inside config to view more UI configurations */
transformMxUiConfig: (config) => {
    config.title = "My CAD"; // Modify title
    config.mTopButtonBarData.push({
         "icon": "textIcon",
         "prompt": "test",
         "cmd": "Mx_test"
    }); // Add top button bar button
    ...
    return config;
}

// Modify Sketches and Notes UI mode configuration (same as above)
   // transformMxSketchesAndNotesUiConfig: (config) => config

// Modify CAD shortcut commands (command aliases)
/** Click inside config to view more CAD shortcut command configurations */
transformMxQuickCommand: (config) => {
    // Add aliases '_test', 't' for command Mx_test
    // config is the MxCAD internal command alias array object
    config.push(['Mx_test', '_test', 't'])
    return config;
}

// Modify server configuration
/** Click inside config to view more server configuration modifications */
transformMxServerConfig: (config) => {
    config.serverUrl = "/api/cad"; // Modify API address
    config.font.push('txt.shx', 'gdt.shx'); // Add font files that MxCAD project needs to load initially
    ...
    return config;
}

// Modify Vuetify theme configuration
/** Click inside config to view more Vuetify theme configuration modifications */
transformVuetifyThemeConfig: (config) => {
    config.defaultTheme = 'light'; // dark or light
    return config;
}
Core Dependency Libraries
mxcad-app has the [mxcad](https://www.mxdraw3d.com/mxcad/zh/) core library built-in. Users can directly use mxcad without installing the mxcad plugin again in the project. If used in a non-modular way, mxcad is mounted on window.MxCAD, and you can directly access the required methods and classes using MxCAD.
import { MxCpp } from 'mxcad'

// Get the current mxcad object
const mxcad = MxCpp.getCurrentMxCAD();
mxcad depends on mxdraw. Users can also directly use mxdraw in their projects. If used in a non-modular way, mxdraw is mounted on window.Mx. You can directly access the required methods and classes using Mx.
import { MxFun } from 'mxdraw'

// Output command line content
MxFun.acutPrintf('Test output')
The prerequisite for directly importing mxcad and mxdraw modules is to use a build tool. We provide plugins for webpack and vite to support modular development. As long as the plugin is used, you can directly use import to import mxcad and mxdraw modules.
MxCAD Project Secondary Development Example
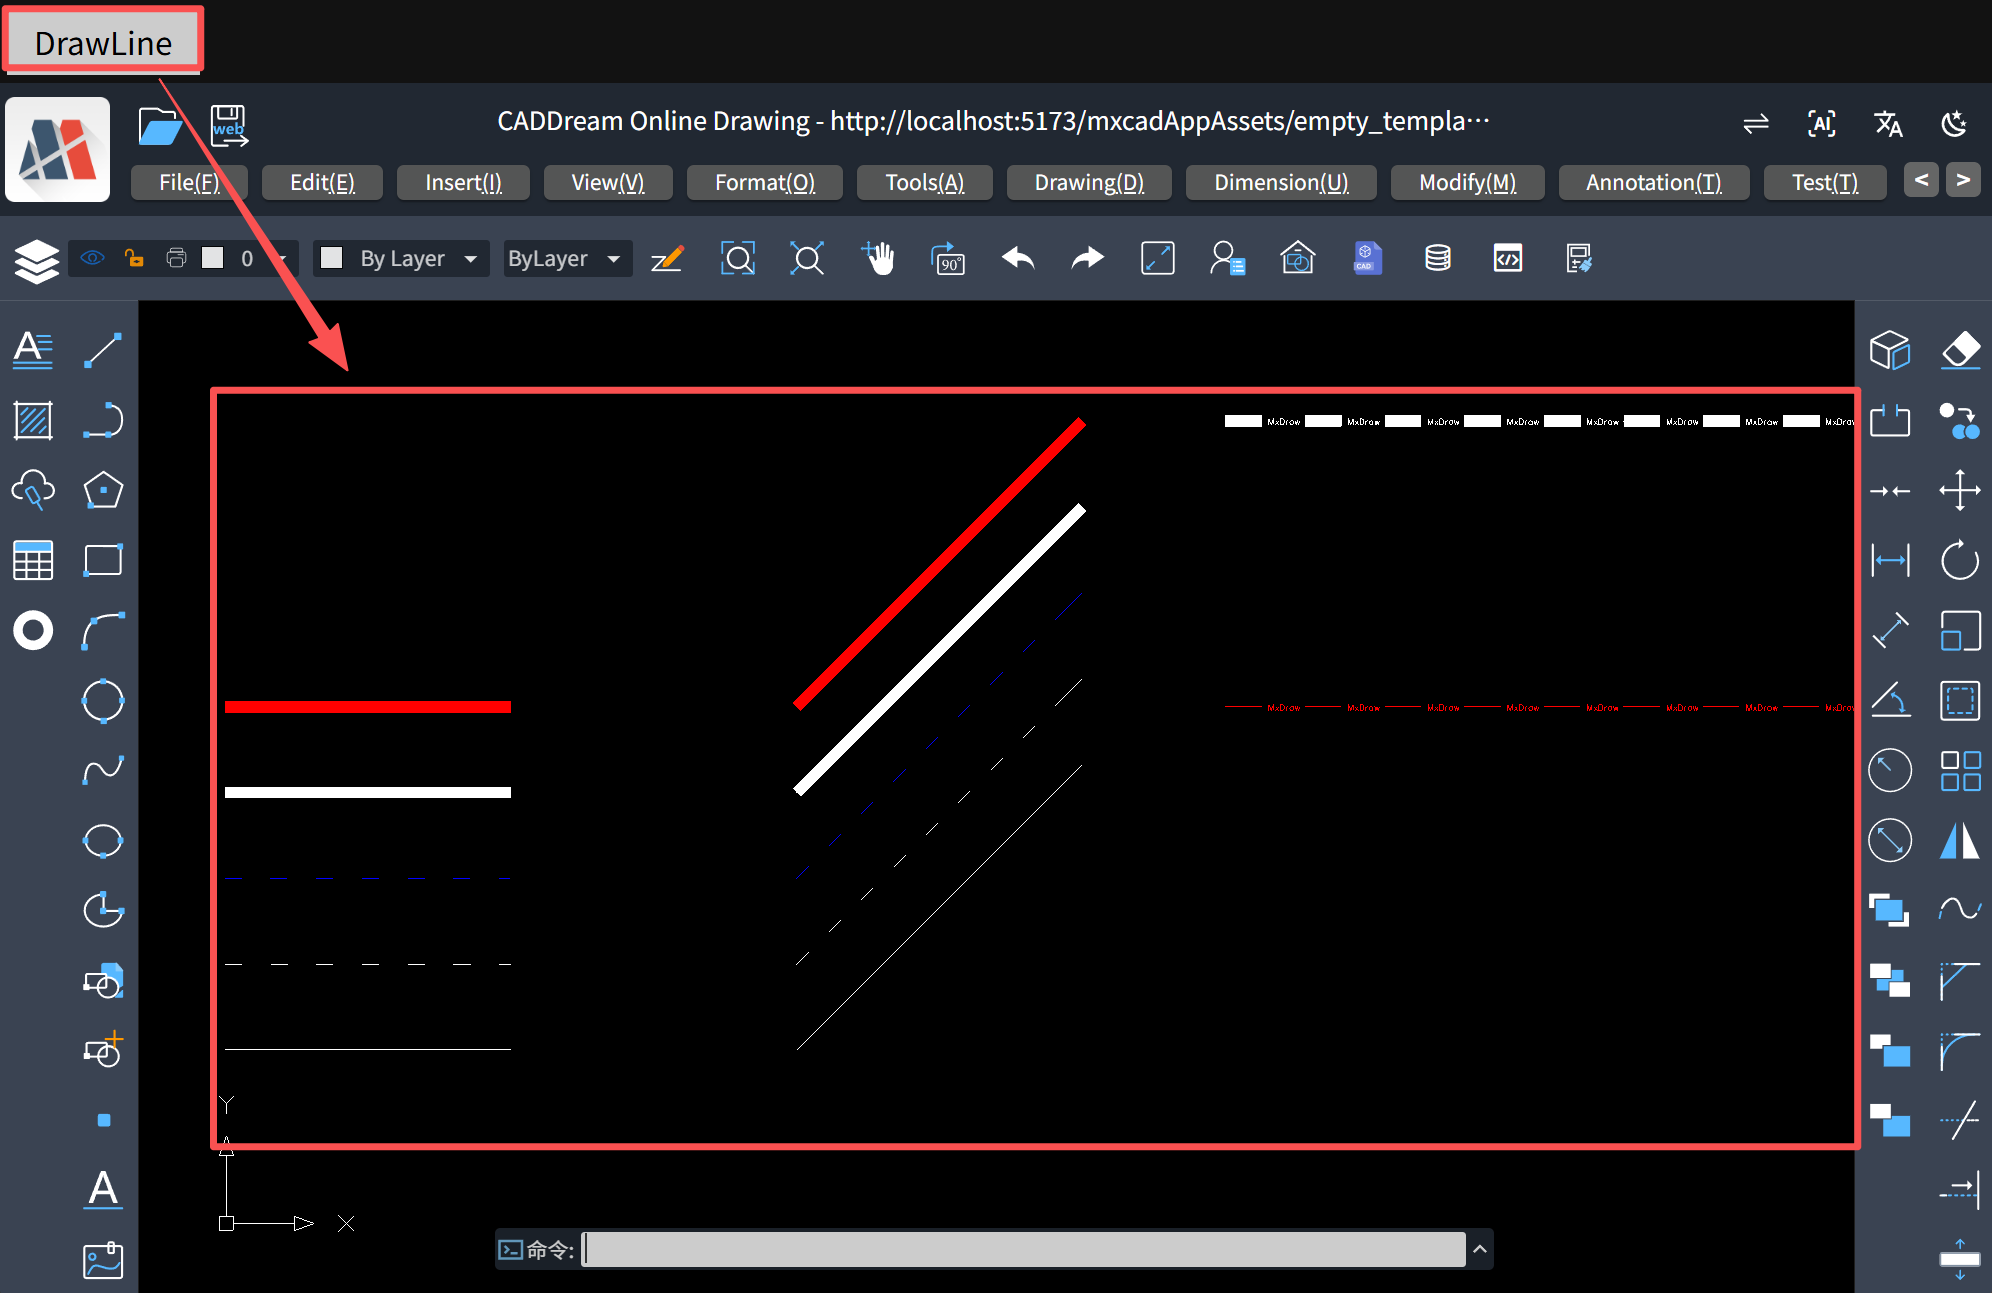
Based on the above operations, we have integrated the MxCAD project into our system and completed the initial configuration. Next, we can proceed with secondary development based on this CAD project. Below is an example of implementing parametric drawing of various lines in the project. After implementing the drawing command in our own system and registering it, we call our line drawing command in the MxCAD project and execute the corresponding parameter operations.
Adding Methods to Draw Various Lines
import { MxCpp, McCmColor } from "mxcad";

function Mx_Test_DrawLine() {
  let mxcad = MxCpp.getCurrentMxCAD();
  // Clear current display content
  mxcad.newFile();
  // Reset color to black and white
  mxcad.drawColorIndex = 0;
  // Change linetype to solid line
  mxcad.drawLinetype = " ";
  // Set linewidth to 4
  mxcad.drawLineWidth = 0;

  // Create a layer named "LineLayer"
  mxcad.addLayer("LineLayer");
  // Set current layer to "LineLayer"
  mxcad.drawLayer = "LineLayer";

  // Directly draw a solid line
  // Parameter 1: Start point X coordinate, Parameter 2: Start point Y coordinate, Parameter 3: End point X coordinate, Parameter 4: End point Y coordinate
  mxcad.drawLine(0, 0, 100, 0);
  // Draw a solid diagonal line
  mxcad.drawLine(200, 0, 300, 100);

  //----------------------------------------------------------------------------------------------------------
  // Draw a dashed line
  // Define dashed line data, "MyLineType" is the linetype name, "6,-8" is a unit definition of the dashed line, 6 is the solid line length, -8 is the space length.
  mxcad.addLinetype("MyLineType", "6,-10");
  // Set current linetype to "MyLineType"
  mxcad.drawLinetype = "MyLineType";
  // Draw a dashed line
  mxcad.drawLine(0, 30, 100, 30);
  // Draw a diagonal dashed line
  mxcad.drawLine(200, 30, 300, 130);

  //---------------------------------------------------------------------------------------------------------
  // Change line color to 16711680 (Blue). 16711680 in hex is 0xFF 00 00, where FF is Blue, 00 is Green, the second 00 is Red.
  mxcad.drawColor = new McCmColor(0, 0, 255);
  // Draw a blue dashed line
  mxcad.drawLine(0, 60, 100, 60);
  // Draw a blue diagonal dashed line
  mxcad.drawLine(200, 60, 300, 160);

  //---------------------------------------------------------------------------------------------------------
  // Reset color to black and white
  mxcad.drawColorIndex = 0;
  // Change linetype to solid line
  mxcad.drawLinetype = " ";
  // Set linewidth to 4
  mxcad.drawLineWidth = 4;
  // Draw a line with width.
  mxcad.drawLine(0, 90, 100, 90);
  // Draw a diagonal line with width
  mxcad.drawLine(200, 90, 300, 190);

  //---------------------------------------------------------------------------------------------------------
  // Draw a dash-dot line
  mxcad.addLinetype("MyLineType2", "10,-2,3,-2");
  // Change linetype to dash-dot
  mxcad.drawLinetype = "MyLineType2";
  // Change line color to 255 (Red). 255 in hex is 0x00 00 FF, where 00 is Blue, the second 00 is Green, FF is Red.
  mxcad.drawColor = new McCmColor(255, 0, 0);
  // Draw a red dash-dot line with width.
  mxcad.drawLine(0, 120, 100, 120);
  // Draw a red diagonal dash-dot line with width
  mxcad.drawLine(200, 120, 300, 220);

  //---------------------------------------------------------------------------------------------------------
  // Add a linetype with shape
  mxcad.addTextStyle("MyLineTypeTextStyle", "txt.shx", "hztxt.shx", 1);
  mxcad.addLinetypeEx("MyLineType3", "(12.7,(\"T=MxDraw\",\"S=2.54\",\"L=-5.08\",\"R=0.0\",\"X=-2.54\",\"Y=-1.27\"),-10.08)", "MyLineTypeTextStyle");
  mxcad.drawLinetype = "MyLineType3";
  mxcad.drawLineWidth = 0;
  // Draw a red dash-dot line with width.
  mxcad.drawLine(350, 120, 600, 120);

  //---------------------------------------------------------------------------------------------------------
  // Add a linetype with shape
  // Reset color to black and white
  mxcad.drawColorIndex = 0;
  mxcad.drawLineWidth = 4;
  // Draw a red dash-dot line with width.
  mxcad.drawLine(350, 220, 600, 220);

  // Fit all entities to the current display viewport
  mxcad.zoomAll();
  // Update viewport display
  mxcad.updateDisplay();
}
Registering the Drawing Command
import { MxFun } from 'mxdraw';

MxFun.addCommand("Mx_Test_DrawLine", Mx_Test_DrawLine);
Binding Call Logic (Example: Clicking a Button)
<button onclick="MyTestFun('Mx_Test_DrawLine')">Draw Line</button>const MyTestFun = (str) => MxFun.sendStringToExecute(str);Functional Effect Demonstration:
For more mxcad-app related example project references, you can download our mxdraw Cloud Drawing Development Package to view more details.
Cloud Drawing Development Package Download Link: https://www.mxdraw.com/download.html